Payroll Processing Guide - UKG (with Sync note)
Navigate to Team > Payroll > Process Payroll
Adjust the date filters as needed to show the payroll you will be processing. Navigate to the Payroll Prep Process by selecting the first icon next to the appropriate date.
- Initiate Payroll
**This generates all Pay Statements to the Payroll. In most cases you will select (1) All On Assigned Pay Period, (2) PST Type: Regular, (3) Initiate
**After each step is completed, you can use Mark as Complete (right hand side of screen) to keep up with where you are in the process. Mark as Complete DOES NOT mean you have done the step – it is just to assist in keeping your place in the steps and moves the progress bar in the top left along.
TIMEKEEPING CLIENTS ONLY
If a client is using timekeeping, there will be an additional step after Initiate Payroll to Sync Time.
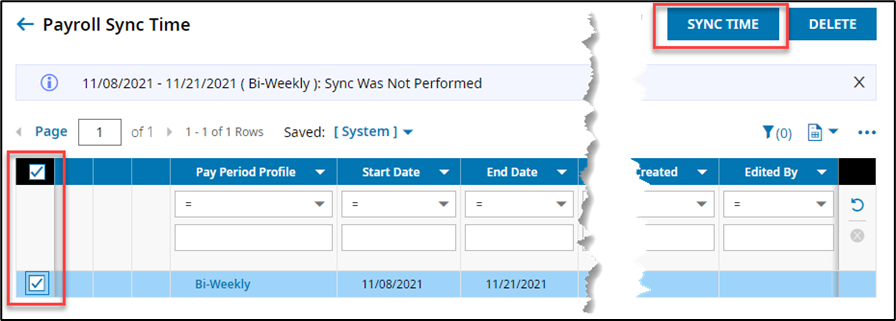
**This will bring in the time from the Time Prep Process. Click on Sync Time.

Click on the checkbox next to your time batch and click on Sync Time in the top right corner.

After the time is done syncing, you will return to the main screen and proceed to the next step(s).
- Add/Edit Batches (see notes at end of document)
**This step allows you to edit batches.
- Add/Edit Pay Statements (see notes at end of document) – View Pay Statements
Add/Edit Batches
**Allows you to edit all pay statements at once. Best for adding line items in mass (EX. Bonuses)
Add/Edit Pay Statements
**Allows you to view and edit each pay statement Individually. Best for one off changes and entering hours for hourly employees.
**This step allows you to edit individual pay statements. This is where you would enter hours or make edits to an individual employee.
**Any time you make any changes to the pay statements, including initial creation, you have to also click on Recalculate Pay Statements. This step is what updates YTD numbers for employee pay statements. DO NOT skip this step.
- Sign-Off Open Alerts
**This step allows you to review any errors and/or alerts with your payroll. Errors may include missing tax settings, missing earning codes, or checks generated for terminated employees. Alerts may include items that need to be manually added/changed to individual pay statements. You will have to investigate each.In order to check open alerts, you will click on View Unresolved Alerts.
After you have resolved all of the alerts, you will select the check box next to each alert and Mark as Complete.
**If you still see alerts/errors after marking as complete, you may need to recalculate the pay statements again.
- Close/Open Payroll
**This step locks the pay statements from being edited. This ensures when you pull any preview reports the numbers will not move.
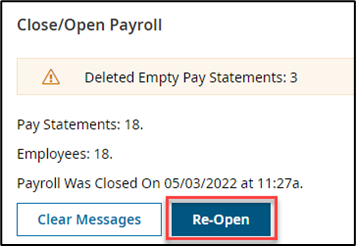
When a payroll is closed, it will automatically delete any empty pay statements for any employees not being paid.
If mistakes are found and the payroll needs to be re-opened, you can click on Re-Open – make sure to check the boxes that say Open All Pay Statements and Rollback Check Numbers. This will open the pay statements for editing as well as rollback any check numbers for LIVE checks.

- Check Your Totals
**This step allows a high-level view of all payroll totals.- View Payroll
**This step allows you to preview different reports used to check the pay statements – typically view (1) Employees Not Paid, (2) Payroll Register (by PST), and (3) Payroll Recap & Funding (Pre-Process) (Beta)
- Finalize: Submit Payroll
**Submitting Payroll Indicates a client is done with payroll and it is ready to be finalized.
Finalize Payroll
**Clients cannot complete this step. Selecting Finalize Payroll submits the bank file and pushes the payroll out to the ACH warehouse. If a mistake is made, you must get Rita or Andrew to roll back the payroll.
From the Payroll Prep screen there are two ways that data can be edited when processing payroll:
- Add/edit batch
- Add/edit pay statements
Most users will use one method or the other as a preference based on their needs. In general, for more complex data entry, such as having many labor overrides for example, some users will find pay statement entry to be easier.
By clicking the View Payroll Batches link, you will be redirected to the screen shown below where you can open your batch and complete data entry.
To open a batch for edit, click the Open Batch for Edit icon. After clicking the Open Batch for Edit icon to edit a batch, the following question box will appear.
Notes on Concurrent Users
- Usually, the Allow Concurrent Edit By Multiple Users box is selected to allow multiple users to have access to edit/make changes, save data entry, and close the batch. When this box is checked, the pay statement may be edited directly from the batch.
- When the Allow Concurrent Edit By Multiple Users is not checked, only the user who opened the batch will have access to make changes in the batch and save. If a user attempts to view and edit the pay statement from the batch, a warning message will appear at the top of the screen.
- If you have multiple batches, (for example one Regular batch from the Initiate Payroll step, plus one from Sync Time) check the box for Show Records From Other Batches and the records from all batches will become visible. In this case, the records from the other batch will be visible, but not editable.
On this screen, you can select the columns you need for data entry. For example, you can add a column for Overtime Hours, Bonus Amount, etc. There are many available columns within batch edit available to assist with the input of your payroll data.
Add / Edit Pay Statements
As noted above in Add/Edit Batches, there are two ways that data can be edited when processing payroll – either by add/edit batch and/or add/edit pay statements. However, most users will use one over the other as a preference based on their company needs. In general, for more complex data entry, e.g., multiple labor overrides, some users will find pay statement entry to be easier.
This is done under the View Pay Statements link. The primary difference between editing batches and pay statements is the organization of the information on the screen. Batches show information across employees and pay statements. The pay statement screen shows all the information for a single pay statement at a time.
After selecting View Pay Statements, you have the ability to add a new pay statement, or edit, preview and delete pay statements contained in the batch. You can also move directly to the individual employee information screen if needed.
You may use the following items for the selected employee to edit, preview, delete or edit employee information.
- Use the
icon to edit the pay statement for the selected employee.
- Use the
icon to preview the pay statement for the selected employee.
- Use the X icon to delete the pay statement for the selected employee.
- Use the
icon to access the selected employee’s Employee Information file.
If you would like to view the detail for an employee’s pay statement, select the Edit icon to view or edit any employee pay statement.
On the View/Edit Pay Statement screen, you can edit the employee pay statement if needed.
- You can add one or more rows to the pay statement by clicking the Add Rows button.
- Like the batch edit screen in the previous step, the ability is provided to enter data manually that will appear on the pay statement.
- You can add columns for the entry of cost center overrides, shifts, etc.
Related Articles
2025 CPS Year End Guide
As we close in on the end of 2025, we want to thank all of our clients for their continued trust in CPS to handle all of your Payroll, Time & Labor Management, and Human Resource needs. The end of the year can be stressful for all businesses, and it ...2024 CPS Year End Guide
As we close in on the end of 2024, we want to thank all of our clients for their continued trust in CPS to handle all of your Payroll, Time & Labor Management, and Human Resource needs. The end of the year can be stressful for all businesses, and it ...UKG Release Notes – July 2025 – R100
UKG Release Notes – July 2025 – R100 Learn more about the most impactful enhancements available in this release by checking out the short Release Spotlight video. For a deeper dive, please see attached. KEY FEATURES THIS UPDATE HR: Correct mistakes ...UKG Release Notes – December 2024 – R96
UKG Release Notes – December 2024 – R96 Learn more about the most impactful enhancements available in this release by checking out the short Release Spotlight video. KEY FEATURES THIS UPDATE HR: Within Benefit Plan configuration, the Employee Self ...UKG Ready - Release 96 Highlights